Windows 10 operating system was released not long ago. Its main difference from previous versions will be that it will be the last version of Windows line-up, although the updates will continue to release. As reported by Microsoft on April 2017, the OS will continue to receive new updates in a timely manner approximately twice a year.
Despite the rapid development of the operating system, machines with installed Windows OS eventually start working slower and freezing down, because they get clogged up with all sorts of programs and files. If you use a computer or laptop running Windows 10, it is likely that you periodically visit Internet resources in order to find all sorts of guidelines for speeding up the operating system.
Perhaps you have already seen this information before, but it would be great to mention not only something new, but also to combine this knowledge with already known information so that you could always have a handy reference on how to improve your Windows PC performance.
- How to speed up Windows 10
- Method 1. Prevent programs launching at system startup
- Method 2. Use fewer applications at a time to reduce the load on RAM for better performance
- Method 3. Check if your operating system is not damaged
- Method 4: Scan your PC for malware
- Method 5. Shutting down and restarting Windows is not even an option. It is a necessity
- Method 6. Give preference to sleep mode on your PC
- Method 7. Make your Windows interface as simple as possible
- Method 8. Make sure Windows always gets the latest updates
- Method 9. Quick launch applications
- Method 10. Choose priorities for your PC
- Method 11. Disable Cloud Sync to speed up Windows 10
- Method 12. Use Quick Start to reduce the boot time of your computer
- Method 13. Use ReadyBoost to increase Windows 10 performance
- Method 14. Disable Live Tiles
- Method 15. Use high-performance mode to improve PC performance
- Method 16. Use the integrated troubleshooting tool
- Method 17. Improving application performance in Windows 10
- Method 18. Free up space on the system disk
- Method 19. Disable the third-party Anti-Virus application
- Method 20. Recover the computer
- Questions and answers
- Comments
How to speed up Windows 10
Method 1. Prevent programs launching at system startup
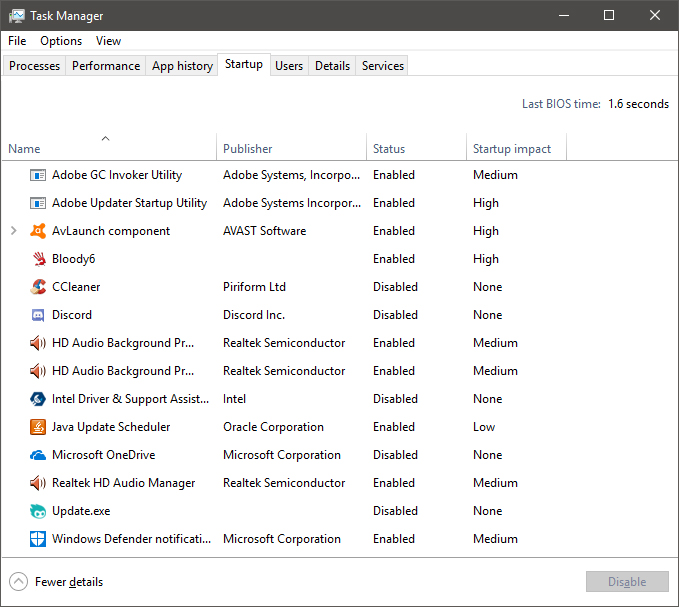
Usually the most Windows users computers have a lot of applications which automatically launch on systems startup. Basically it is the native software installed by the manufacturer, and other programs auto-run by default that can be canceled.
Especially, the performance decrease on computer startup, when desktop is loading and at the same time with a lot of other applications. This significantly slows down the operation of the device, therefore you need to minimize the number of auto-run programs. You can disable the automatic launch feature using the Task Manager.
For Windows 7 or Windows XP, you should use msconfig for disabling autorun.
Method 2. Use fewer applications at a time to reduce the load on RAM for better performance
Simultaneous use of several applications can increase your productivity if you work as a designer and need to open Adobe Photoshop with Adobe Illustrator at the same time, for example. But this creates an additional load your PC. In most cases, CPU does not suffer as much as RAM, since RAM is the main resource used.
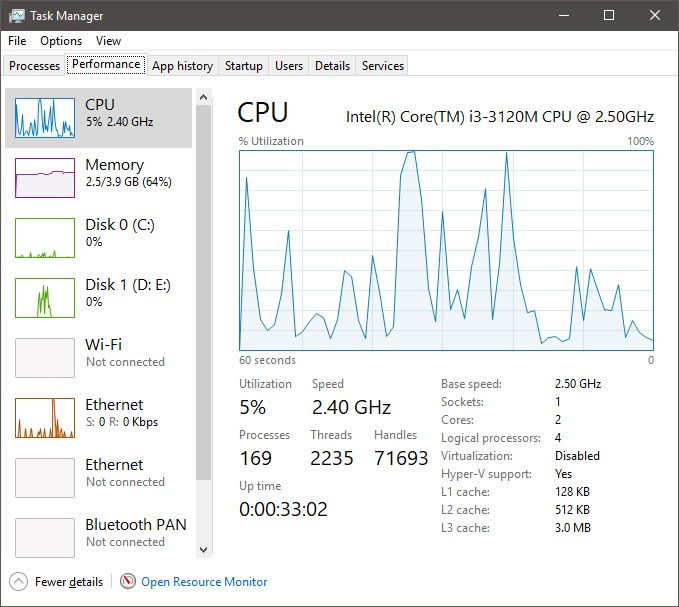
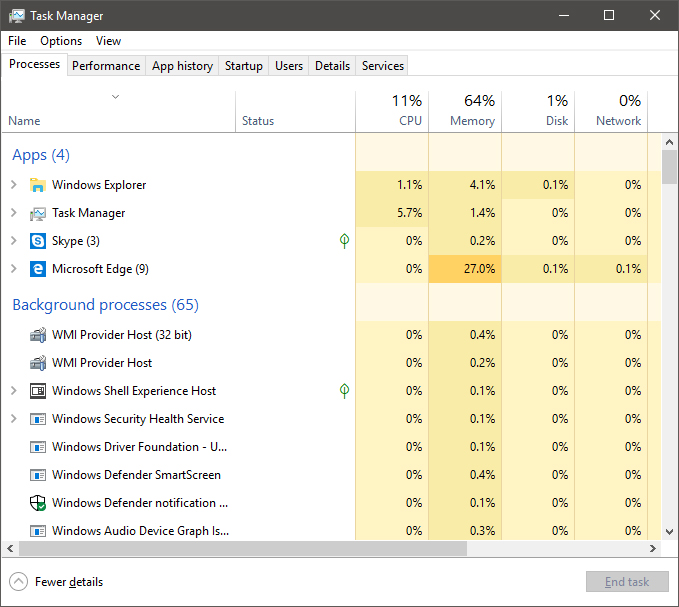
You should try running Task Manager and monitor memory usage on Performance > Memory tab. If the statistics show that programs are overloading RAM, you can easily track the software responsible for it on the Processes tab, which will allow you to improve the performance of your Windows 10 device.
Note: Make sure that you do not reset an important system process.
Filling the system memory accordingly slows the computer down. Adding more operating memory is one of the options that can solve the problem of low productivity, but this will require some financial costs. A less effective tool to resolve poor productivity of Windows 10 system is to increase the size of the pagefile.
How to change the pagefile? Below you will find a detailed instruction.
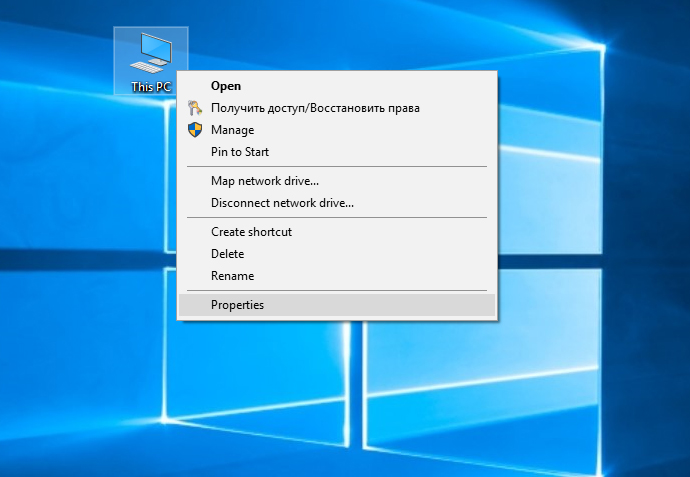
1. Go to My Computer > Properties.
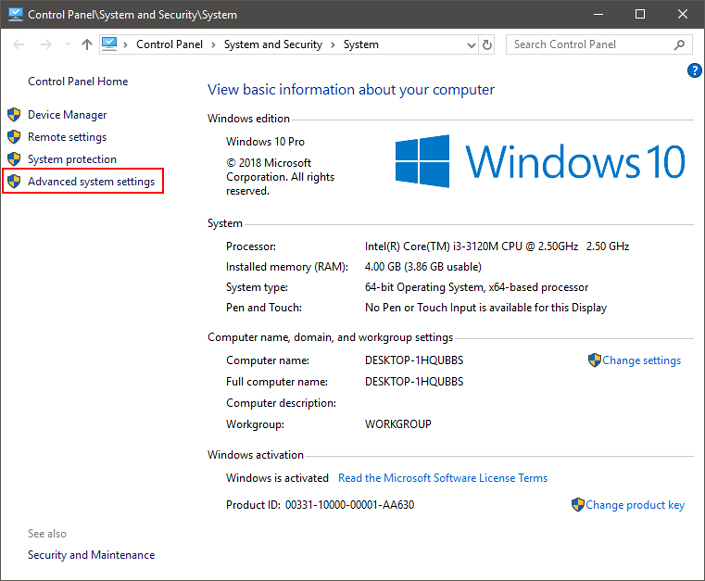
2. Select Advanced System Settings.
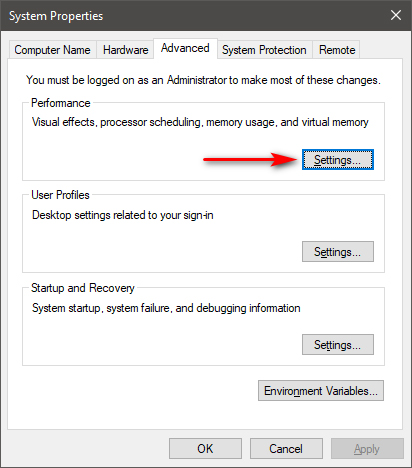
3. On the Performance section, click Settings and go to the Advanced tab.
4. On Virtual Memory section, click Change.
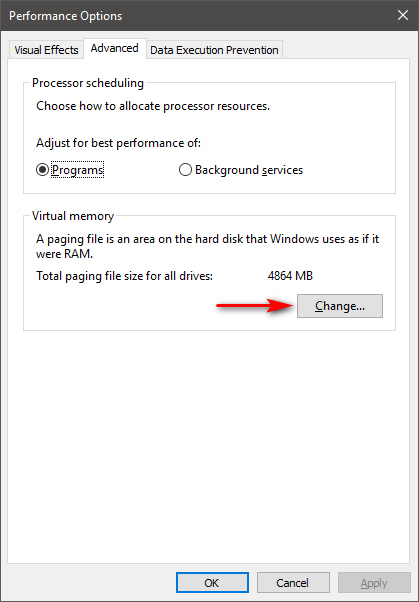
5. Uncheck Automatically manage paging file size for all drives. Select the drive you need and turn on Custom Size. Set the initial and maximum file size. Click OK button to save the changes.
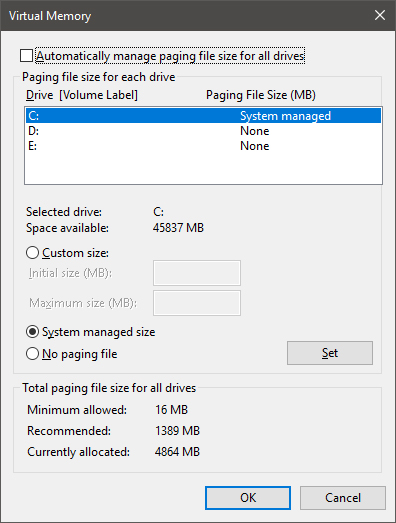
Note: If you have excessive amount of, say 16 GB, there is no need to increase the size of the paging file. However, turning it off is not an option worth considering, since in this case the computer may encounter certain problems.
Method 3. Check if your operating system is not damaged
Damaged data can lead to degraded performance of your Windows 10 computer, and in the worst cases, result in fatal error.
One of the easiest ways to fix corrupted data on Windows 10 is to launch the system file checker utility. You are likely already familiar with it if you have previously used it in attempts to restore your hard drive or USB drive. Restoring such damaged files can undoubtedly speed up Windows 10.
How to run System File Checker in Windows 10?
In command line and enter the following command:
sfc /scannow
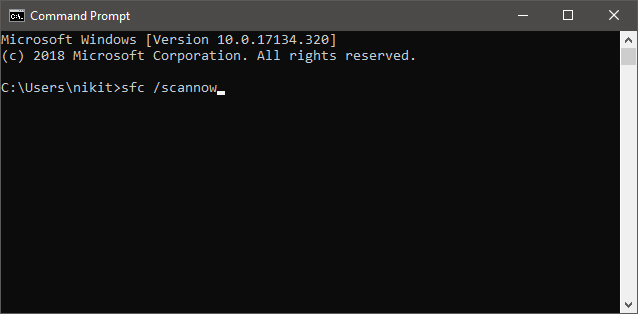
This process may take some time depending on the size of your hard disk. An alternative way to launch the described above tool: My Computer > Windows Disk (right-click on it) > Properties > Tools. Now click Check.
Method 4: Scan your PC for malware
This should be the most anticipated item that you could see in our article about accelerating Windows 10. Various computer viruses have been around for decades, and the fear of how they might affect the operating system led Microsoft to include anti-virus software in the list of default programs; it’s called Windows Defender.
It is likely that some application disguised as some system update program or something else may stand behind the poor performance of your Windows 10.
You need to check your computer for malicious software regularly using Windows Defender or any other third-party anti-virus software, which will not only speed up Windows 10, but also will help to avoid a number of other unpleasant situations associated with viruses.
Method 5. Shutting down and restarting Windows is not even an option. It is a necessity
Unfortunately, some users neglect this rule and their personal computers can be active all day long, even if their owner is already asleep for the fifth hour, forgetting that his device also needs to “Shut down” or at least “Reboot”.
Keep in mind that your computer is able to survive several days without restarting or shutting down the system, however this is not at all a call to action and does not mean that you should always keep it in working condition.
Restarting or shutting down the computer at certain time intervals allows it to clear the system memory, which in turn is gradually consumed during operation, and kills all false processes opened automatically or due to a problem when starting any of your programs, which speeds up the Windows 10 system.
Method 6. Give preference to sleep mode on your PC
If you put your computer into sleep mode, it will take much less time to turn it on than if you start the system that has been turned off. This is due to the fact that the current state of the system, since your last working session, is saved on the hard disk and is loaded again when the device starts.
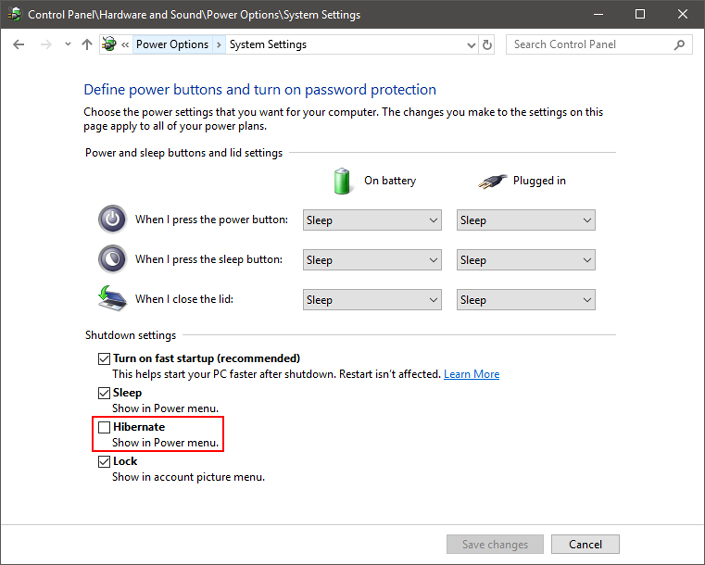
Give your PC some sleep.
Putting the computer into sleep mode is commonplace for any Mac user, as these devices can survive for almost a month by working this way. Now Windows users can more confidently use this mode, keeping their computer in sleep mode for a long time.
At the moment when the sleep mode is activated on your PC, only RAM continues to perform its full-fledged work. It is important to note that even though the sleep mode puts the computer into a hibernated state, it still consumes a certain amount of battery power, albeit in small amount. Thus, even though it is energy-intensive, the sleep mode allows you to speed up the work with the system to a certain extent.
Method 7. Make your Windows interface as simple as possible
Turn off any animations and all special effects.
All modern PC operating system developers have tried to make everything look great, filling them with various animations and effects, as this makes the process of working with the device much more convenient. All good things usually have a different side – sometimes these visual improvements consume much more system resources than we would like. Not all PCs have powerful enough components to allow themselves to function efficiently while maintaining all the visual amenities on the screen.
Sometimes it happens that users do not use their device properly; they install random applications and make a number of other errors that cause their computer to suffer performance degrading.
Now, let’s look at how to enable or disable animations in Windows 10?
In the settings you can easily switch to the best performance mode by turning off all the animations. Follow the steps below:
My computer (right-click on the icon) > Properties > Advanced system settings > Settings (in the Performance section).
In the Performance Options window, select Adjust for best performance. If it doesn’t suit you, you can always set Custom preferences and enable or disable certain effects you need.
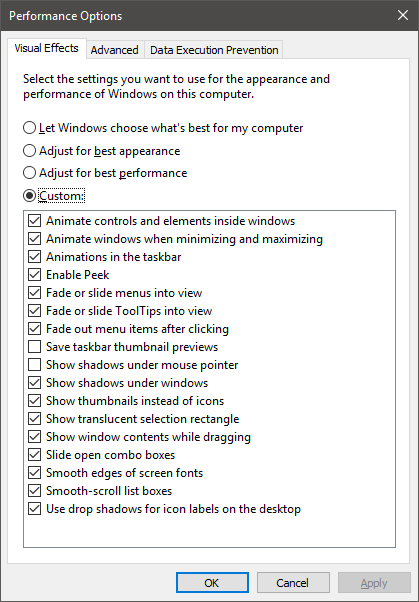
Turn off transparency.
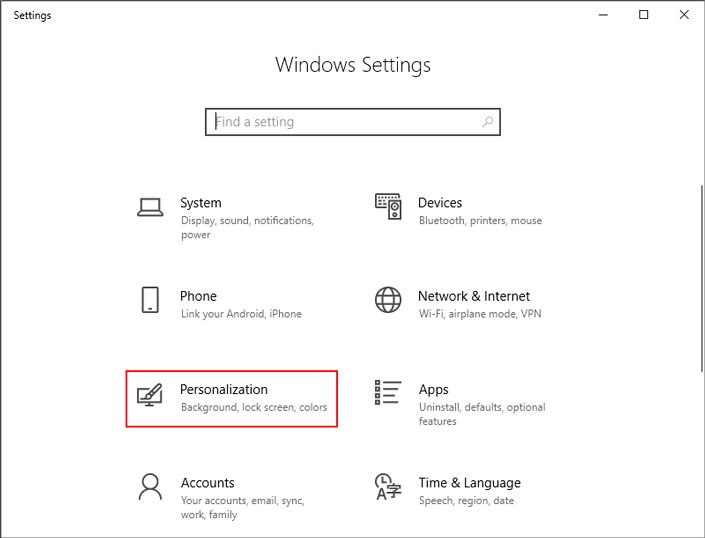
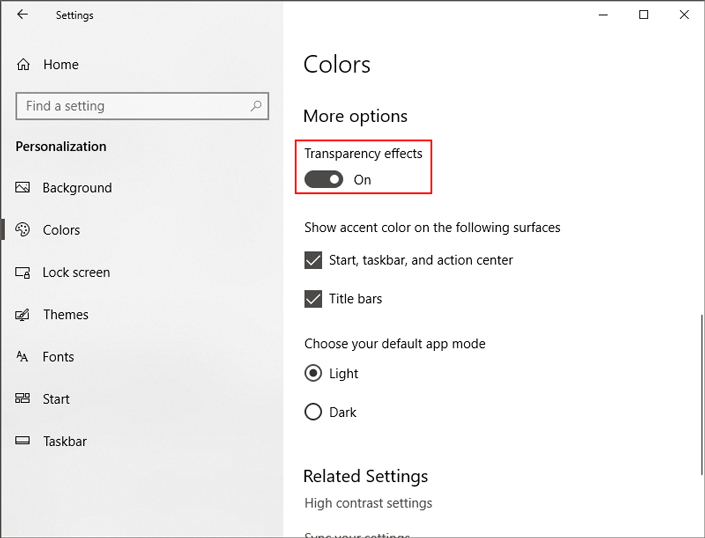
Having a taskbar, a beautiful Start menu and a transparent action center can be an eye candy, but as you know, beauty requires sacrifice and, in this case, you have to pay with your computer’s resources. You can turn off transparency by going to Settings > Personalization > Colors. Click the switch to “Turn Off” next to “Transparency Effects”.
Method 8. Make sure Windows always gets the latest updates
There are a lot of updates in the Windows working environment and new fixes come out with a certain frequency, which can be installed either independently or forcibly/voluntarily, when the operating system installs them. Do not forget that a regular update of the system on your computer can improve the performance of Windows 10 in addition to protecting the device from unwanted threats in face of the recently discovered Microsoft vulnerabilities.
Starting with Windows 8, Microsoft began to provide universal drivers for a huge amount of third-party hardware. Updates for such devices are delivered via Windows Update service. In this case if one of the third-party devices does not support the driver provided by Microsoft, you will have to update everything manually.
If you are using the latest versions of Windows 10, the updates will be installed significantly faster than it was before. This is due to the fact that Microsoft has optimized the process of updating the operating system and now most of the installation takes place in the background while the user goes about his business.
Method 9. Quick launch applications
This is one of the ways to speed up daily used Windows 10. You can set your own shortcut keys to launch applications in 1 click without having to search them on the device.
Method 10. Choose priorities for your PC
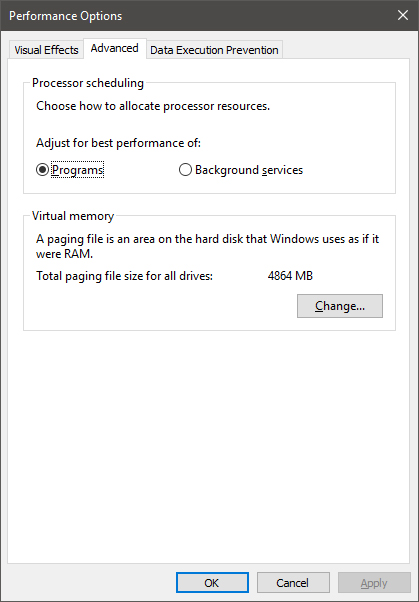
In the same performance window, which we mentioned just above in paragraph 7, go to the Advanced tab. There you can determine the exact priority for your computer: programs that are actively used or services running in the background. This setting will help significantly improve system performance to suit your needs.
Method 11. Disable Cloud Sync to speed up Windows 10
Windows 10 offers integrated support for Microsoft OneDrive cloud storage. You can save absolutely any data by simply uploading it to the cloud, where it will be safe even if for some reason the hard disk stops working due to a physical failure. Many users already have their storage on Google Drive; it is likely that they will not be able to use the cloud from Microsoft.
If you prefer using OneDrive and turned the sync on, don’t forget about it. It will surely consume the resources of your computer and will slow down Windows 10 performance. In fact, this may concern not only OneDrive, but also a number of other services.
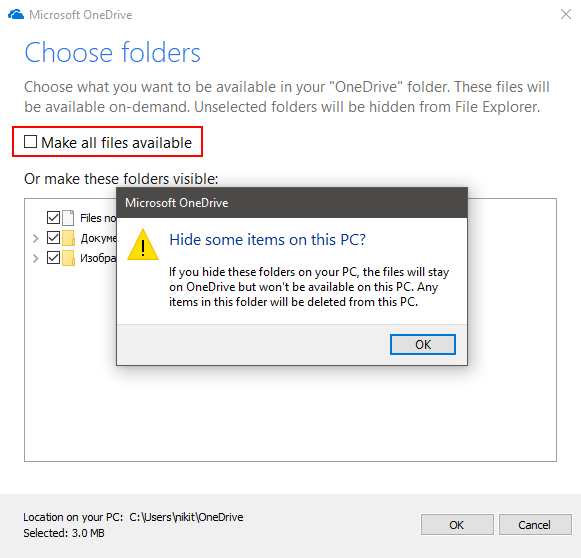
To disable synchronization with OneDrive and speed up Windows, go to My Computer > OneDrive (right-click on it) > Choose which folders to sync. On the next window, uncheck the Make all files available in OneDrive and click OK button.
Method 12. Use Quick Start to reduce the boot time of your computer
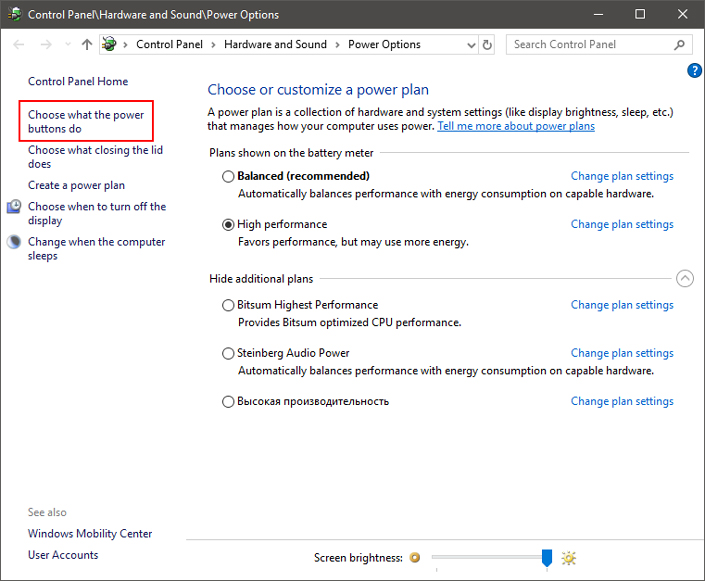
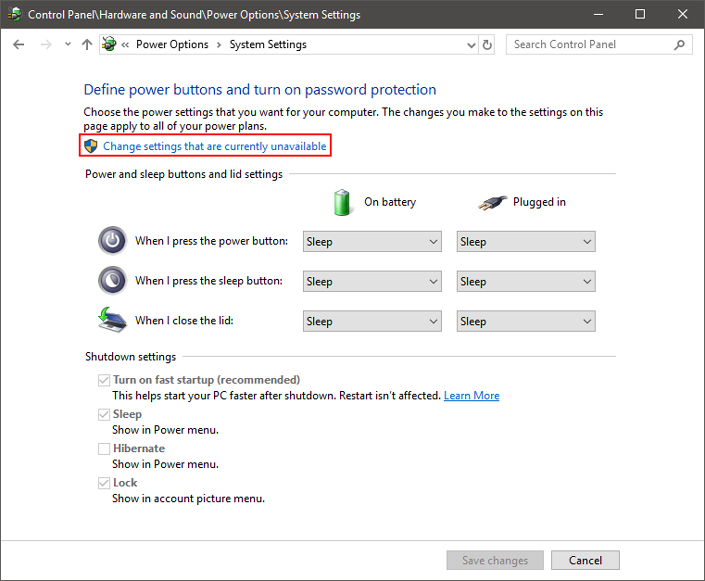
One way to speed up the Windows 10 startup process is to enable the sleep mode feature, which is disabled by default. Quick start (enabled by default) is another function that reduces the time the operating system starts.
You can check whether the quick launch is enabled on your computer by selecting Power Options > Power Button Actions. Click Edit Settings that are currently unavailable to unlock the shutdown configuration. There you will be able to enable or disable the quick launch feature.
Method 13. Use ReadyBoost to increase Windows 10 performance
ReadyBoost – is a Windows function that can increase the speed of your system by using free space for so-called caching. You can observe a noticeable difference in system performance in a positive way, especially if you use low-quality equipment. Keep in mind, that ReadyBoost does not work with SSDs, as they are faster than regular USB drives.
Method 14. Disable Live Tiles
For the first time Live Tiles was launched on Windows 8. This feature is available on the Start menu or on the start screen provides the user with information about a particular application either from the Internet or from a local network. Unfortunately, like any other background service, it consumes computer resources, slowing down the performance draining battery power.
Let’s take a look at how to disable Live Tiles on Windows 10 to increase system performance.
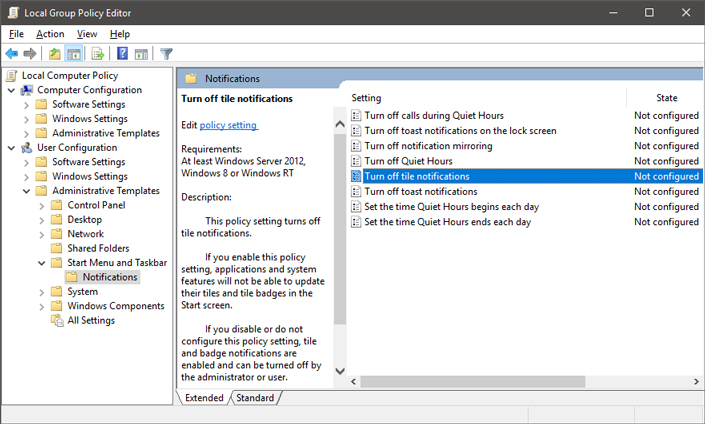
If you are using Windows 10 Pro, you can use Group Policy Editor. Open User Configuration > Administrative Templates > Start Menu and Taskbar > Disable Tile Notifications in editor.
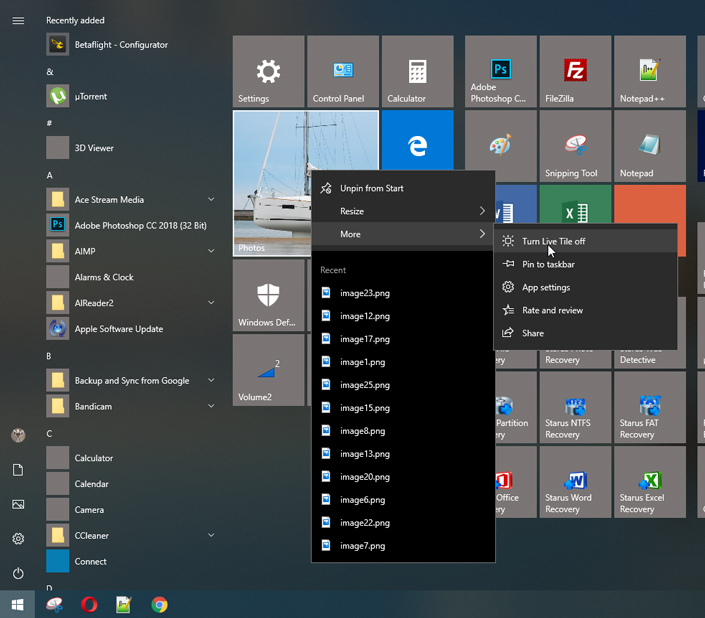
Otherwise, you will have to disable tiles for each application manually. Open the Start menu > right-click on the animated tile of the pinned application > Advanced > Disable live tiles.
Method 15. Use high-performance mode to improve PC performance
High performance mode in power modes allows you to maximize the use of your computer. In this state, the processor can realise its full potential.
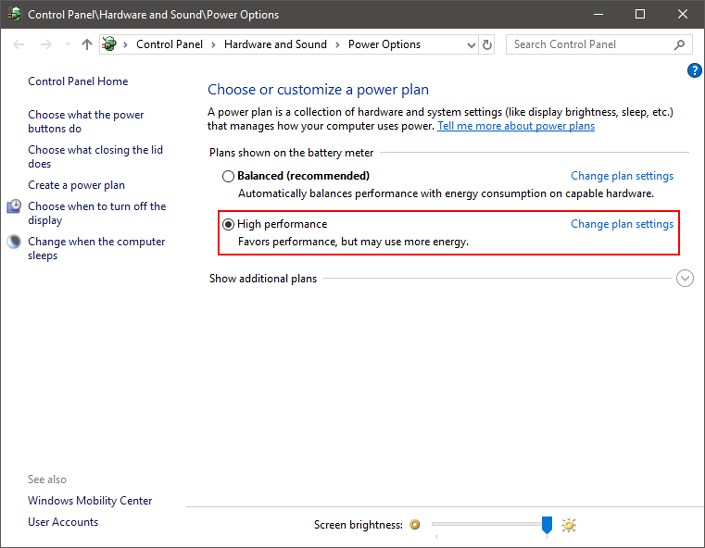
Do not forget to connect the charger when performing resource-intensive tasks.
Have you ever wondered why experienced users prefer laptops over desktops? One of the reasons is that they have a constant power source, significantly increasing productivity. In the case of a laptop, we recommend connecting the charger when you start a game or use “heavy” software that consumes a lot of resources.
Method 16. Use the integrated troubleshooting tool
With the release of the update for developers, Microsoft has provided users with a section for various Windows troubleshooting utilities. Visit Options > Update and Security > Troubleshoot.
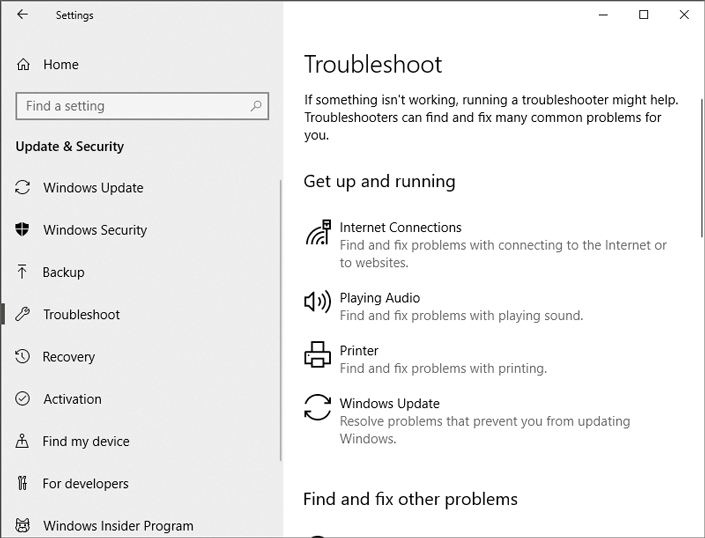
Here you will find options for fixing bugs related to Bluetooth, BSOD, audio, Windows Updates, keyboard and many other system hardware. Troubleshooting may cause your Windows 10 PC to run faster without errors.
Method 17. Improving application performance in Windows 10
If you are using the April update, Windows 10 now has a new settings page that allows you to adjust advanced graphical settings for individual applications (both UWP and classic ones). This can be useful if you are faced with performance issues of a particular application which as you consider are caused by the computer.
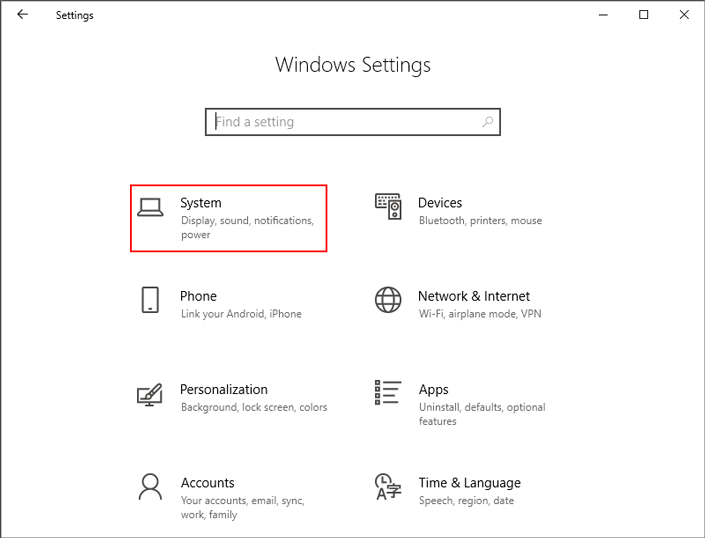
Open Settings> System > Display. Scroll down and select Graphics Settings. On the next screen, select the classic or UWP application you want to configure and click Add button.
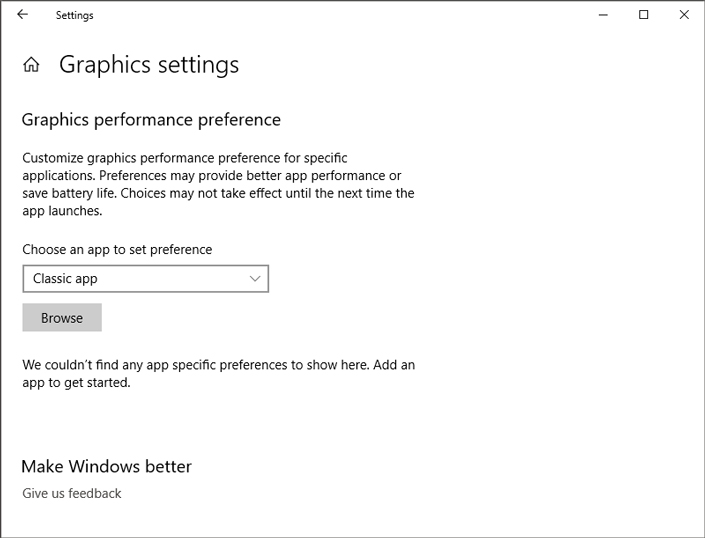
Now click on the application name and click Settings. Here you can choose between various graphical parameters, such as Default, Energy Saving and High Performance. High-performance tuning allows an application to use a discrete graphics system processor.
Method 18. Free up space on the system disk
The computer may work slowly due to the simple lack of physical memory on the hard drive. Check that there is enough free space on the system disk for the normal performance of the operating system. The free space must be at least 10% of the total volume of the “C” disk.
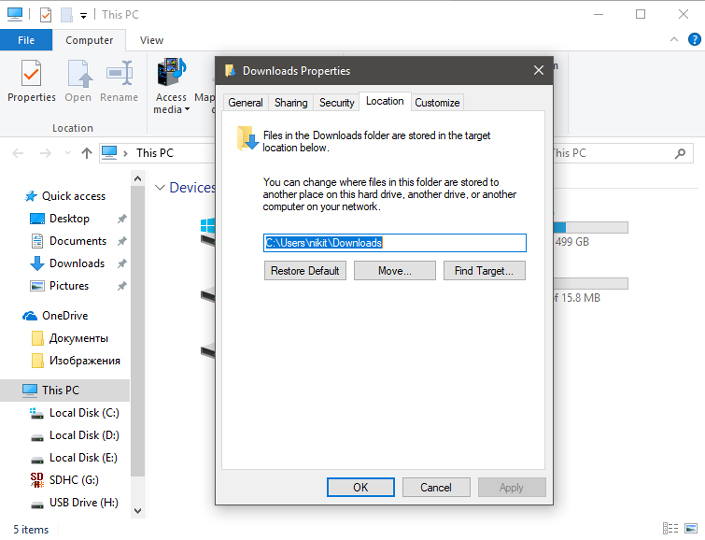
Free up space on the system work disk and clear the desktop of unnecessary elements. Also, it will be much more useful if there is a shortage of space, reassign the storage location of user documents to another logical partition. This will significantly unload the system disk.
You can move the following system user folders:
- Downloads
- Documents
- Images
- Video
- Music
Method 19. Disable the third-party Anti-Virus application
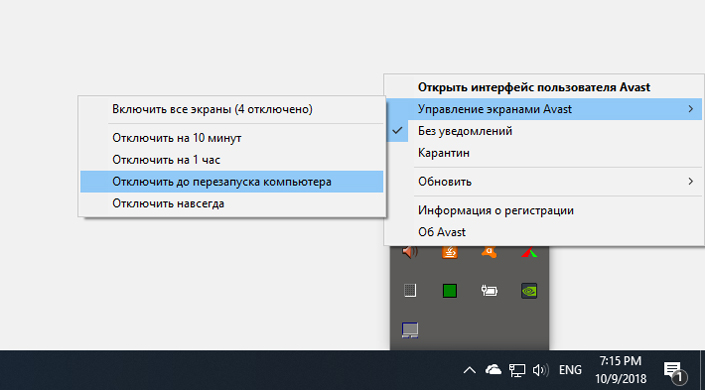
Antivirus applications greatly affect PC performance. If you do not visiting unverified or suspicious Internet resources, then you can disable third-party antivirus while performing any complex tasks. Use the built-in defender of Windows 10 – Windows Defender.
Method 20. Recover the computer
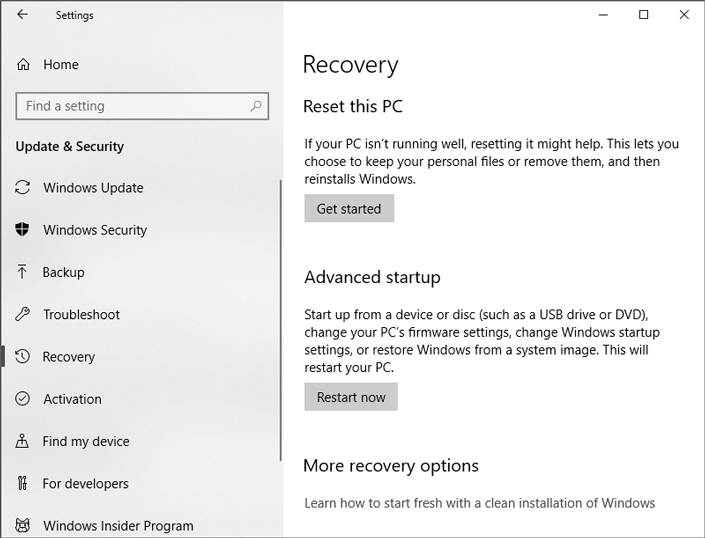
If all the previous methods were ineffective, the last option to solve the problem of poor system performance is to roll back the system. You can do this by visiting the Restore section in the Settings menu. Reinstalling Windows 10 will fix all the errors, and you will again be able to fully use a potential of working operating system.
In case you need to recover deleted files and folders, the Starus Recovery recovery tools will help you. You can try out and download data recovery software for free from our Internet resource.




We hope that this article was useful and this guide will help you to speed up your Windows 10 PC. If you have any questions please leave a comment and we will answer!