Data plays an important role in our lives and keeping it safe is a priority. RAID is a technology that provides reliable data storage by combining multiple disks into a single array. However, if your RAID array created on your motherboard controller encounters problems, you may lose the data stored on it.
In this article, we will tell you how to recover your data and make your storage system reliable again.
Why RAID can fail and how to prevent it
RAID provides a level of security and fault tolerance. However, even with RAID, there are a number of reasons why an array can become damaged. Let’s look at the main causes of RAID damage and how to prevent them.
Hardware problems
- Motherboard damage:
The motherboard is the main board of your computer and its failure can lead to loss of data access. Regularly checking and replacing outdated components will help avoid this problem. - Disk failure:
One of the disks in a RAID array can fail due to physical or logical problems. Regularly monitoring disk health and replacing disks at the first sign of a problem can help prevent data loss.
- Motherboard damage:
Power failure
- Unstable power supply:
Power failures, power fluctuations, or power outages can cause data corruption on disks. Using the right tools, such as uninterruptible power supplies (UPS), will help ensure stable power and protect your data.
- Unstable power supply:
User errors
- RAID Configuration Violation:
Unintentional deletion or reconfiguration of the RAID array by an administrator or ordinary PC user can cause data loss. It is important to be careful and double check the actions when working with the RAID controller.
- RAID Configuration Violation:
Incorrect disk layout
- Disk replacement out of order:
When replacing a disk in a RAID array, it is important to follow the correct order and configuration of the disks. Errors in this process can result in failure.
- Disk replacement out of order:
Switching settings in the BIOS
- Incorrect BIOS settings:
Incorrect parameter changes in the BIOS, such as selecting a different operating mode for the SATA controller, can cause the RAID configuration to be lost. Before making changes to the BIOS, it is a good idea to make sure that the RAID settings will not be affected.
- Incorrect BIOS settings:
To prevent RAID damage, you should regularly maintain the hardware, ensure power stability, be careful when working with the RAID controller, and keep a close eye on changes to the BIOS. It is also recommended that you back up your data to external devices or the cloud so that you can restore your information in the event of a critical failure. Following these precautions will help keep your data safe and secure.
RAID drive fault tolerance level and ability to recover data in the event of a failure
The following RAID types can be created on a desktop motherboard: 0, 1, 5, and 10. The availability of RAID support on a motherboard depends on the motherboard model. Most modern desktop motherboards support RAID 0, RAID 1 and RAID 10, but RAID 5 is also available.
We covered “What is RAID and how does it keep your data safe” in more detail earlier in the article.
The ability to recover data in the event of a raid array failure depends directly on the type of raid created on your motherboard:
- RAID 0 – data striping. This is the simplest type of RAID, which increases performance by allowing simultaneous access to data on multiple disks. However, it does not provide fault tolerance because if one disk fails, access to all data is lost.
- RAID 1 is data mirroring. This is a type of RAID that provides fault tolerance by duplicating data on two or more disks. If one disk fails, data remains available on the other disk.
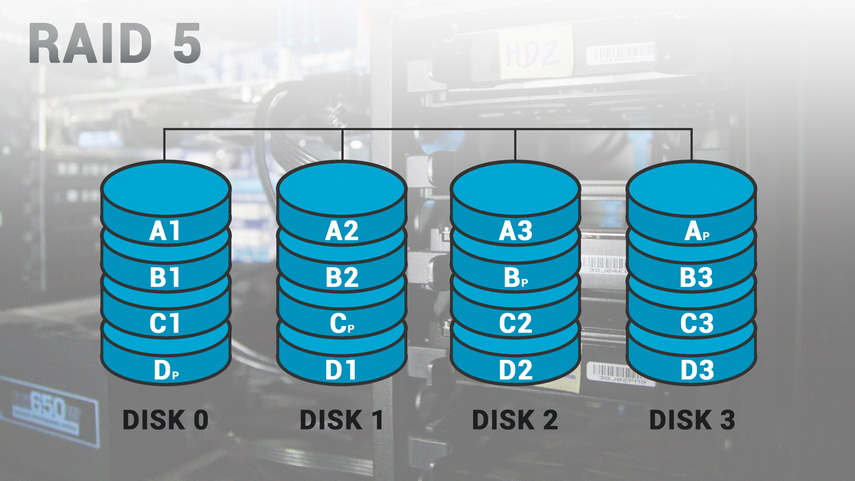
- RAID 5 – Data Allocation and Checksum. This type of RAID provides fault tolerance by distributing data across multiple disks and storing a checksum for each block of data. If one disk fails, data can be recovered from the remaining disks.
- RAID 10 is a combination of RAID 0 and RAID 1. This type of RAID provides high performance and fault tolerance by striping data and duplicating data across multiple disks.
This table summarizes the RAID arrays created on the motherboard:
| RAID Level | Description | Performance | Fault Tolerance |
|---|---|---|---|
| RAID 0 | Data is striped across disks with no redundancy. | High | None |
| RAID 1 | Data is mirrored on two disks for fault tolerance. | Moderate | Moderate |
| RAID 5 | Data is striped with parity for fault tolerance. | Moderate | Single disk failure |
| RAID 10 | Combination of mirroring and striping for high performance and fault tolerance. | High | Single disk failure in each mirrored pair |
We suggest that you consider RAID 5 array recovery as an example.
Preparing for RAID 5 rebuild
Back up your important files.
Before you begin rebuilding your RAID array, the most important thing to do is to ensure the security of your data. If the array is damaged but readable, you should back up all important files to another medium, such as an external hard drive or cloud storage. Then rebuild the array or replace the failed disk with a new one.
Why is this necessary? In case of errors during the array repair process, you don’t risk the ultimate loss of information. Making a backup is your insurance.RAID Condition Assessment.
The first step to repairing a RAID array is to understand what happened and exactly what the problem is. Let’s start by assessing the health of your RAID.
Check the BIOS or the RAID controller utility:
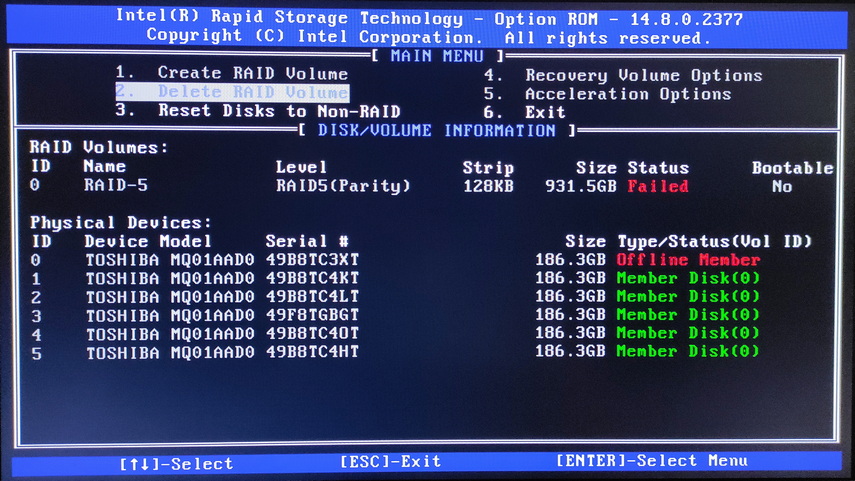
When you turn on your computer, press the appropriate key (usually Del, F2, or F12) to access the BIOS or CTRL + I to access the Intel® Rapid Storage Technology (Intel® RST) RAID controller utility. Check the status of the RAID array. If it is marked as ” Degraded ” or ” Failed “, this also indicates a problem.
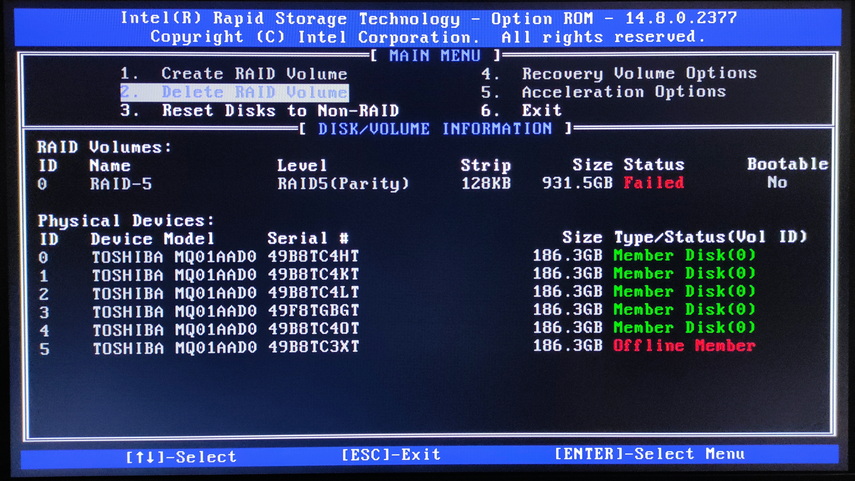
For example, in the following screenshot, you can see that disk number “5” is missing from the array and the raid has a “Failed” status.
It is important to realize that simply identifying a problem does not mean it will be solved. However, this information will help you determine more precisely what has happened to your RAID array and what actions are required to recover.
How to get your RAID 5 array back online
Replacing a failed hard disk drive
• In the AMI BIOS (American Megatrends Incorporated):
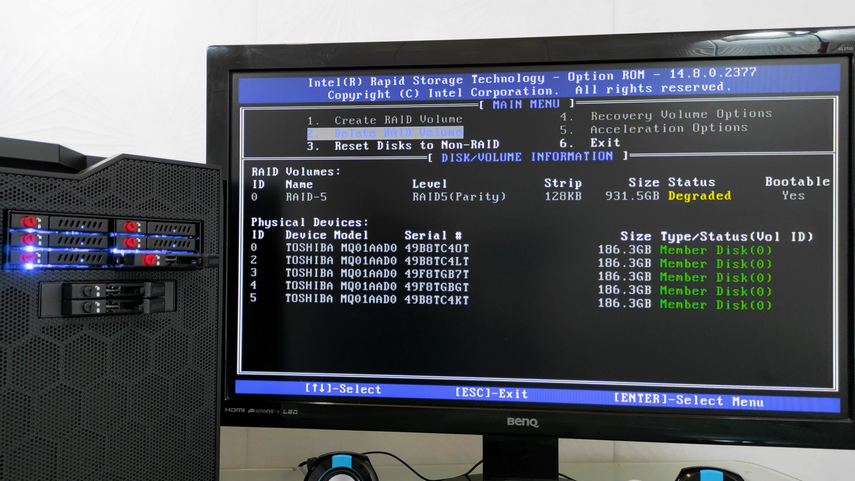
If a single disk fails, RAID status information will be displayed before the operating system boots, indicating that the array is damaged. In the example screenshot below, you can see that disk number «0» has failed and the array status is listed as “Degrated“.
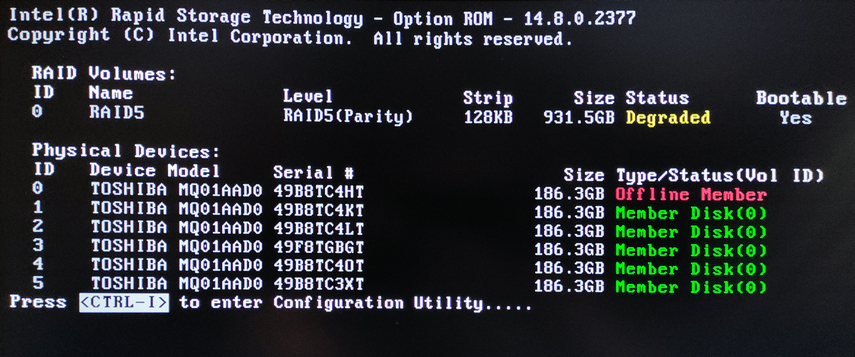
To replace a failed drive with a new one, open the Intel Rapid Storage Technology menu. To do this, press Ctrl+I at boot time. Here you will see a list of all your drives and be able to identify the failed drive by its serial number.
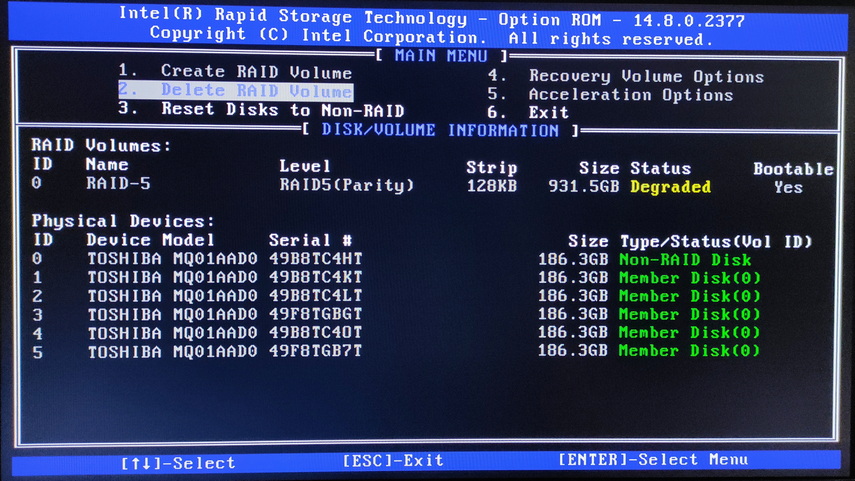
Turn off the computer, then unplug the failed drive and plug in a working drive instead. Then restart the computer. Open the Intel RST menu and you will be prompted to repair the failed RAID by adding a new drive to rebuild the array.
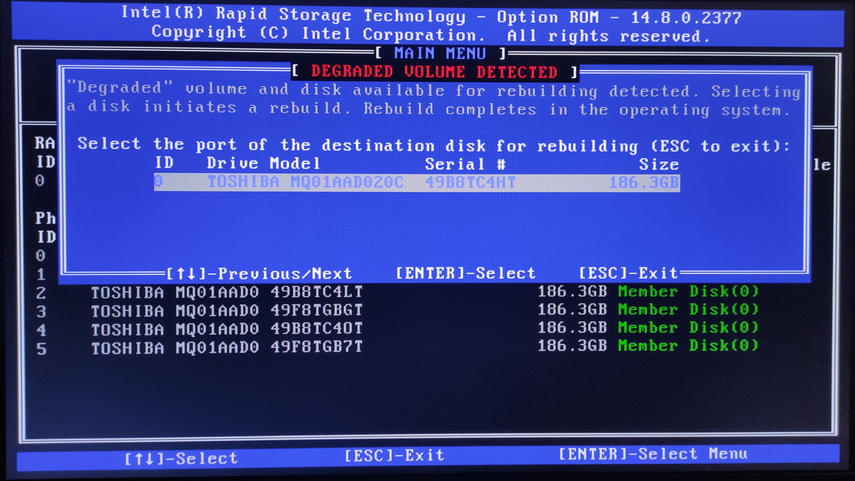
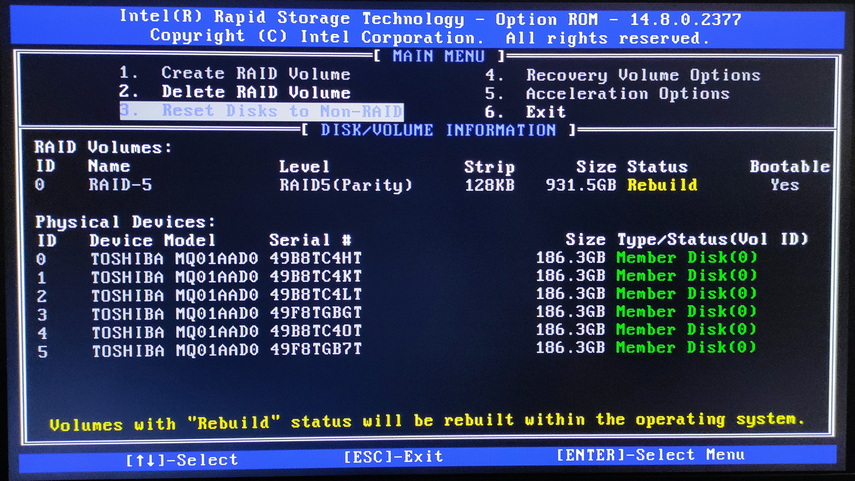
To select the desired disk, highlight it and press Enter, then its status will change to “Rebuild“. A message will be displayed at the bottom stating that “Volumes with ‘Rebuild’ status will be rebuilt within the operating system“. Press ESC to exit and continue booting the operating system.
• UEFI BIOS:
UEFI BIOS is a modern technology with a graphical interface, and you can easily identify what each section is responsible for. Although there are differences in the names and layout of menu items compared to AMI BIOS, the functionality is generally similar.
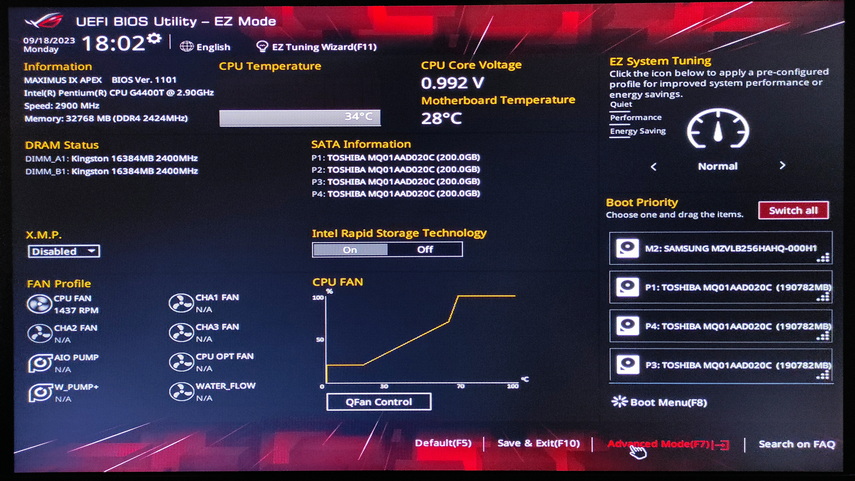
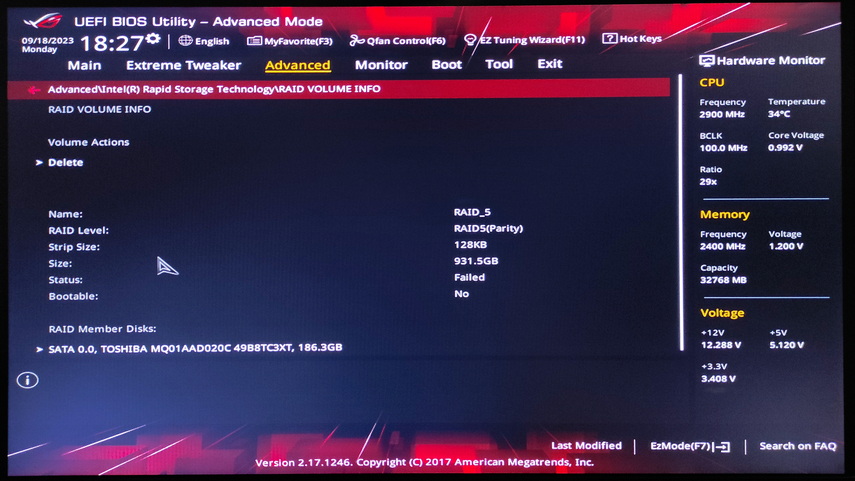
To access your RAID in the UEFI bios, go to Advanced Mode and then Advanced. In this section, look for the Intel Rapid Storage Technology item, which will display information about the status of your RAID array.
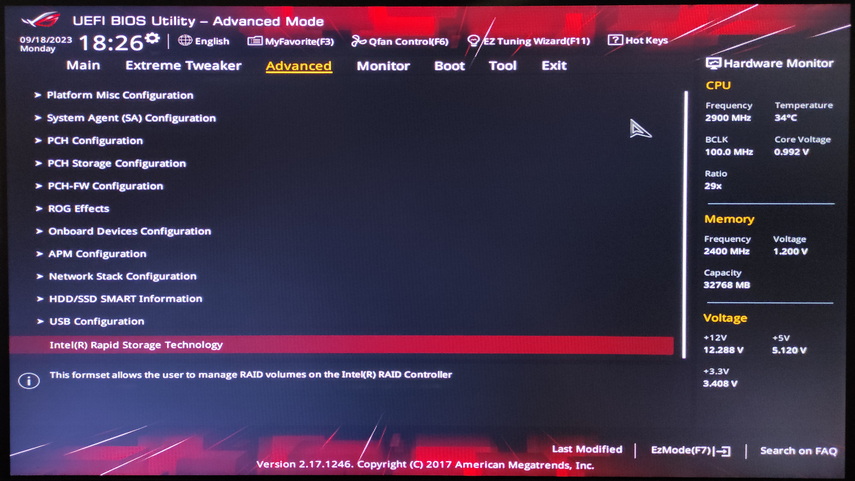
Next, follow the same steps as described above for the AMI BIOS to restore.
Data recovery after executing the Reset Disk to Non-RAID command
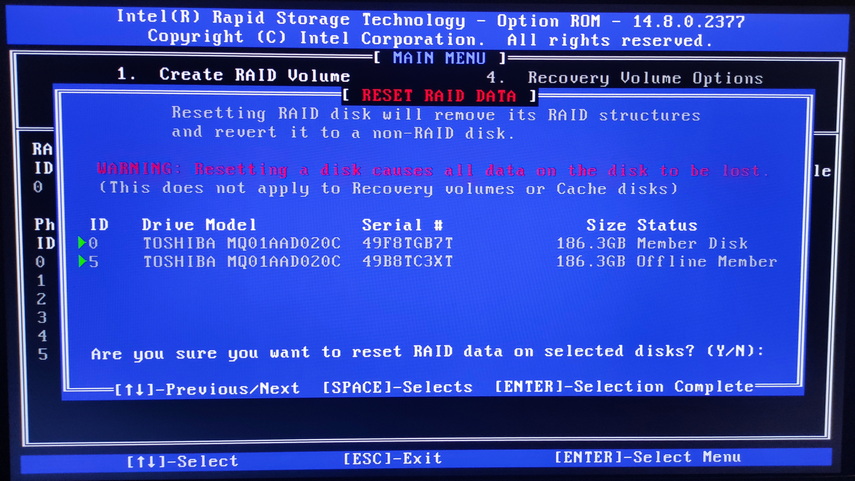
If you accidentally select the wrong device to rebuild the array or exclude it from the raid, when the operating system reboots, the entire array will be corrupted and your data will be inaccessible. The raid status will be marked as unreadable “Failed“.
You can use Starus RAID Recovery software to recover data from a damaged array.
This tool is compatible with various RAID types and is capable of recovering information from failed arrays and drives that were once part of the array. It analyzes the array parameters and information about the motherboard on which it was created, then rebuilds the failed array and recovers the data.
Once the program starts, it will automatically detect the array parameters and rebuild the array. The bottom of the program window will provide detailed information about your array.
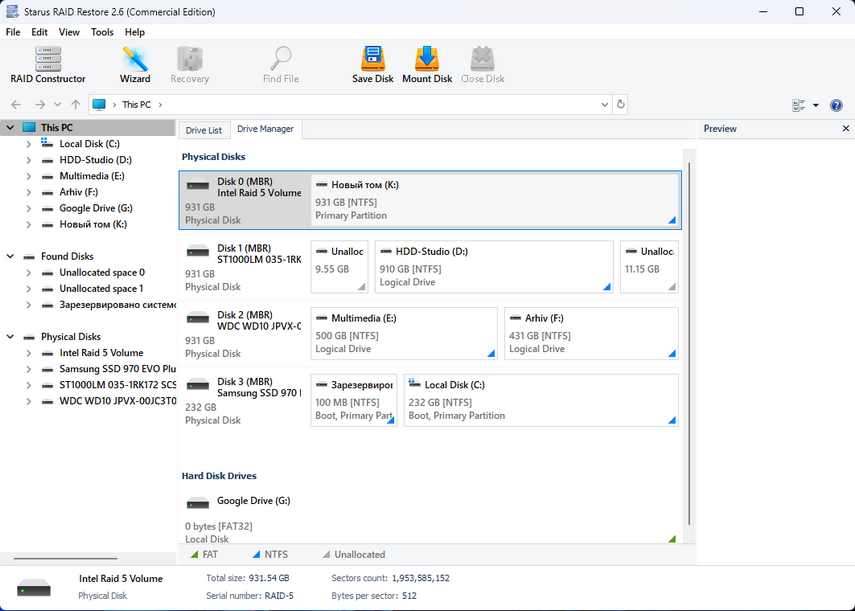
If the program did not find the array after startup – check the availability of media in Windows.
You can see available media for scanning in the left part of the program window – item “Physical disks“.
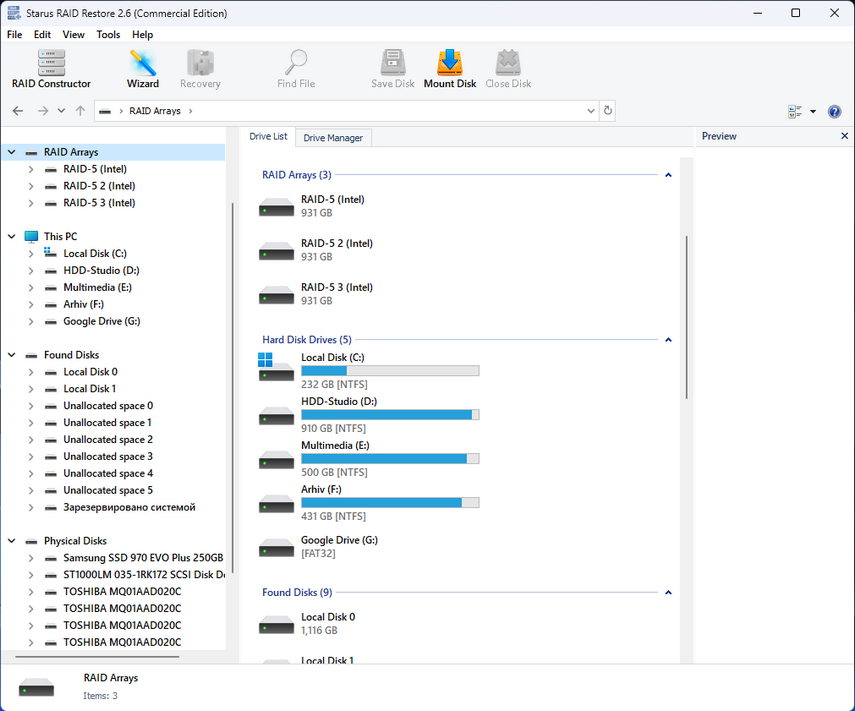
If some physical disks from the array are missing from the list, you will have to go back to BIOS and exclude these disks from the raid array. Then they will become available in Windows and the program will be able to work with them and rebuild the array.
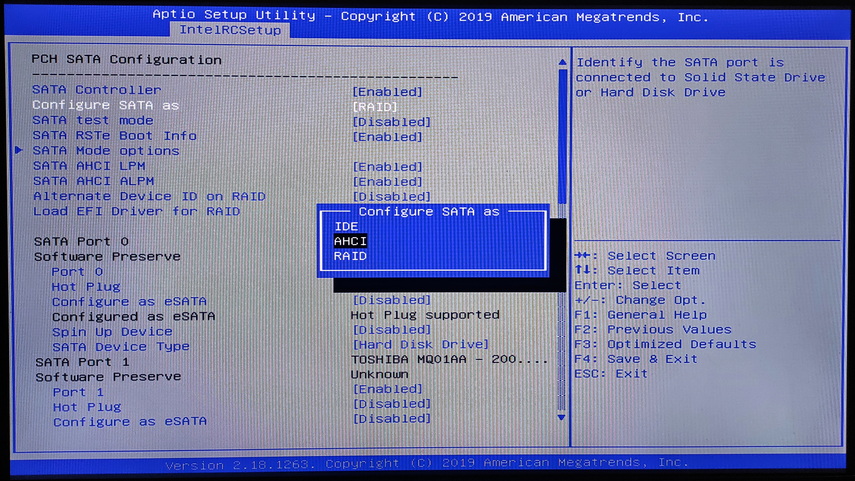
You can also switch the SATA drive mode from RAID mode to AHCI mode in the BIOS to make it available in Windows operating system.
AHCI is a modern drive mode that provides advanced functionality. It allows for hot swapping of hard disks and features a hardware command priority (NCQ) algorithm that significantly improves drive and system performance.
Before you start the data recovery process, make sure you have a drive with enough capacity to store the recoverable files.
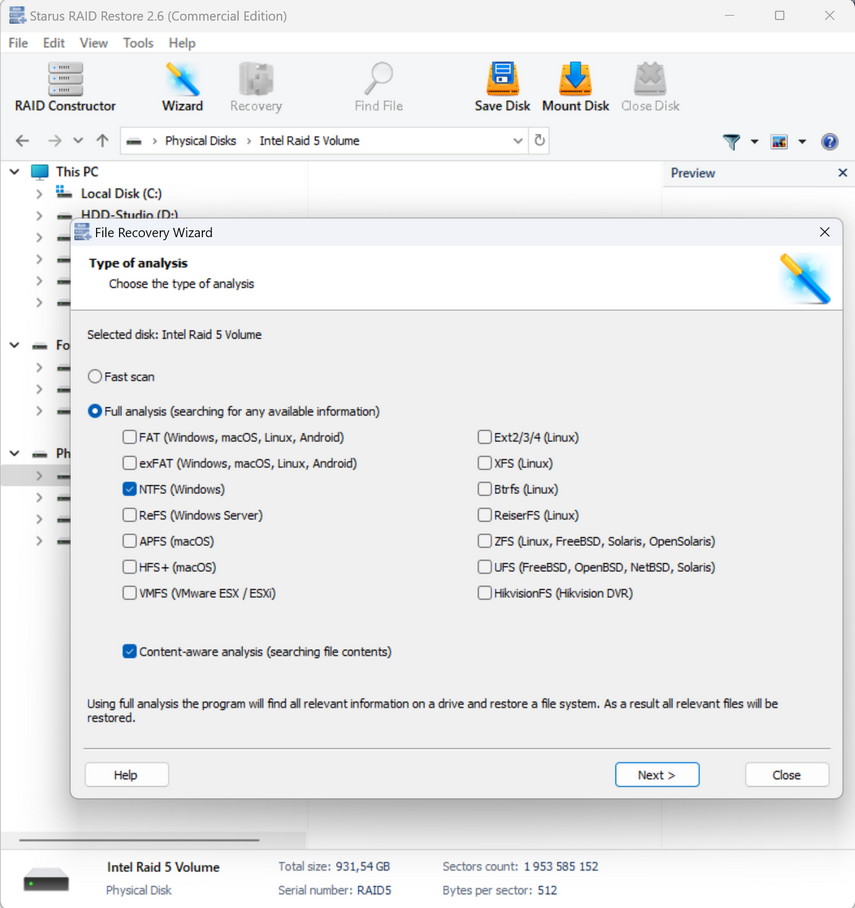
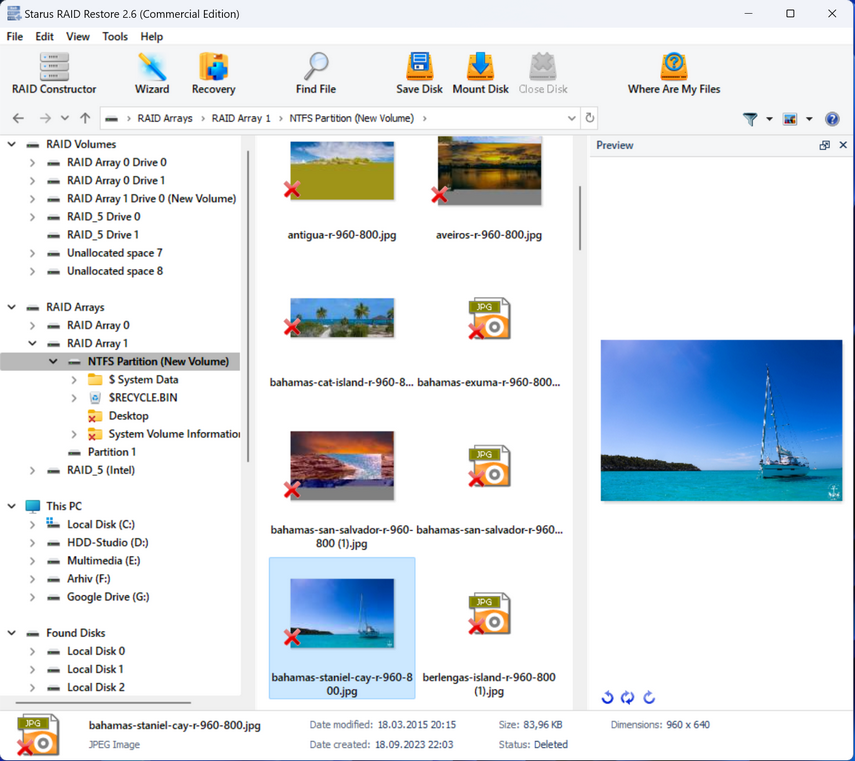
To start recovery, right-click the partition icon and select “Quick Scan“. When the scan completes, select the necessary files or directories and click “Recover“. Then specify a location to save the recovered files and confirm the operation. When the recovery is complete, all files will be available in the specified directory.

If a quick search does not yield the results, you are looking for, you can perform a “Full Analysis“. This process will take longer, but will recover all available files, including deleted files.
How to get your data back if your motherboard or RAID controller malfunctions
Due to hardware malfunctions or motherboard failure, you may need to recover information from connected drives on another computer. However, without special programs, recovery may be difficult because the new motherboard controller will not be able to automatically detect the array parameters. In this case, the operating system may prompt you to initialize or format the drives, which will certainly delete all data from them.
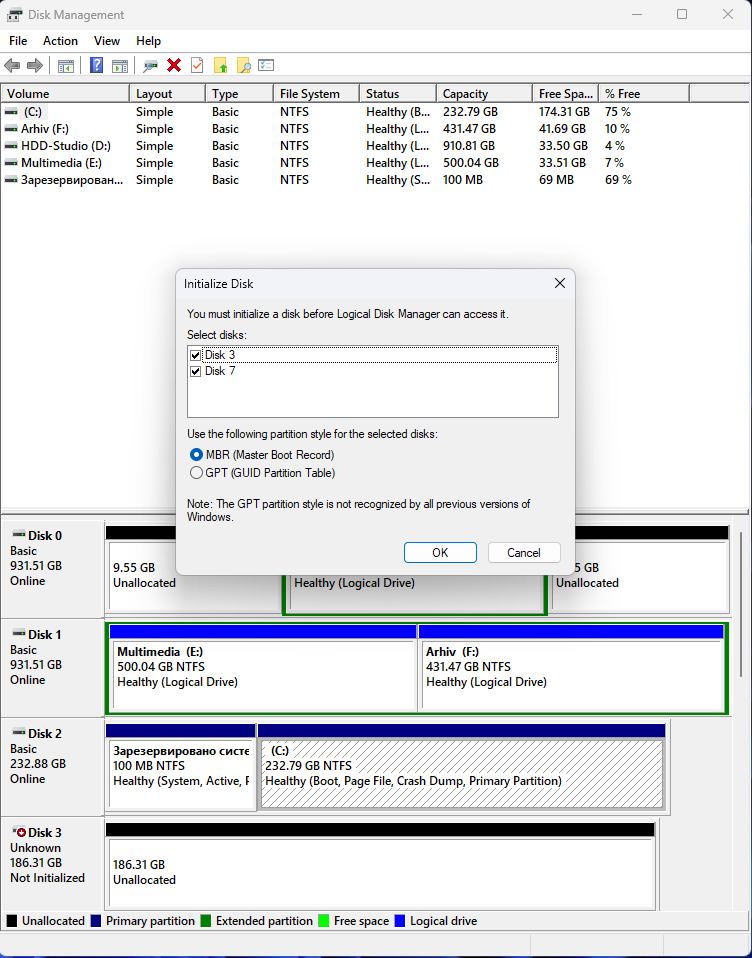
It is strongly not recommended to perform this operation as it will irrevocably delete your data. However, if you have already encountered this problem, our utility will automatically repair RAID, allow you to scan disks and recover important files.
Delete Volume – restore after RAID erasure in Intel RST
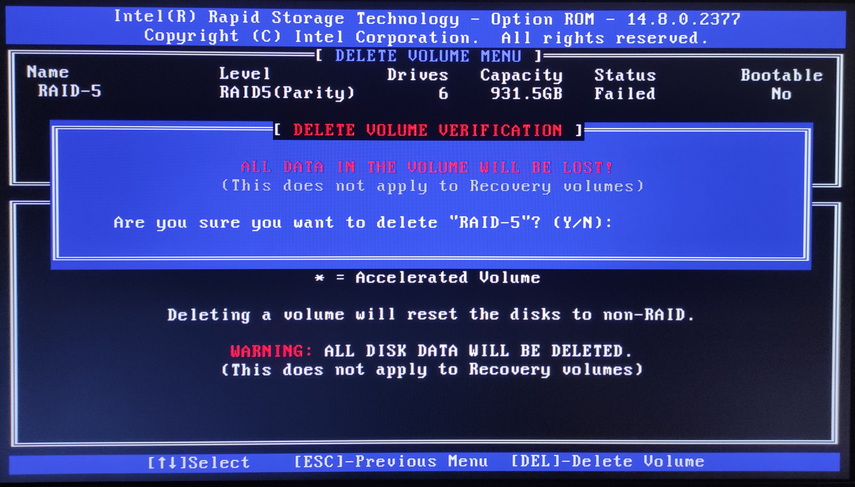
Starus RAID Restore is able to recover your data even after complete RAID deletion via Intel Rapid Storage Technology menu. In this case, the program will automatically detect the type of destroyed array and recover it. Simply run a scan and recover the necessary files.
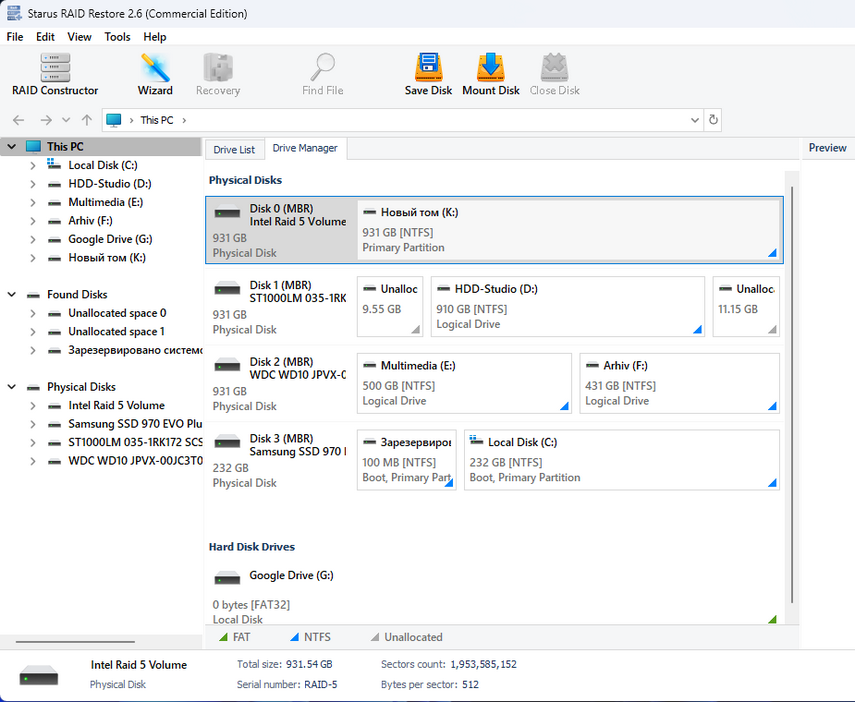
If for some reason the program was unable to repair the destroyed array automatically, you will have to do it manually using RAID Сonstructor.
Select “Manual Creation” and click “Next“. Here you will need to specify all the array parameters such as array type, block size, order, number of media and select them from the list and set the correct order. If there are any missing disks, you need to add them blank. After entering all the data, click “Add” and the array will appear in the disk manager. Then perform a scan and restore the necessary files.
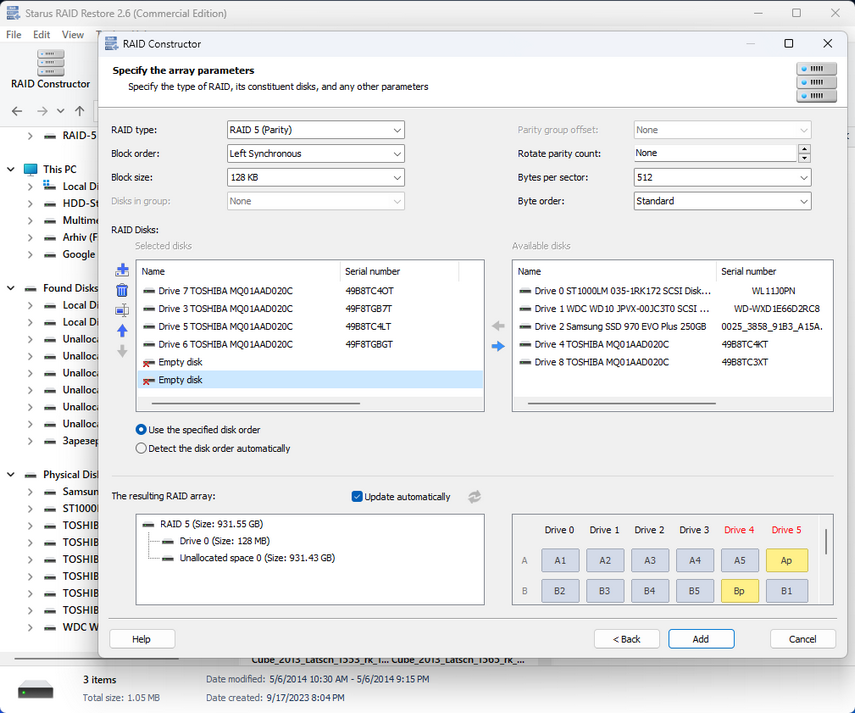
The fifth RAID level remains functional even after a single media failure, but if two disks stop working, the array becomes completely inoperable and file recovery without backup media becomes difficult. With our program you can recover information even if two or more media are missing, but some data may be corrupted.
Conclusion
It is important to realize that even when a motherboard fails or a RAID array is destroyed, there are reliable data recovery tools and methods available. Our Starus RAID Recovery utility provides a reliable solution for such challenging scenarios by automatically detecting and restoring arrays or providing manual recovery options through the RAID Builder.
We remind you of the importance of regularly backing up your critical data to keep your information safe and available in case of unforeseen events.

Recover Deleted Files and Repair Corrupted Partitions
We hope you never experience another data loss, but if you do, we are always ready to help you recover your valuable files!


Which RAID is more reliable - Motherboard RAID or Hardware RAID Controller?
A hardware RAID controller is more reliable and performs better than motherboard RAID. This is because a hardware controller has its own processor and memory, which allows it to perform RAID operations without using the CPU and RAM resources of the computer. RAID on the motherboard, on the other hand, utilizes the computer's CPU and RAM resources to perform RAID operations. This can result in degraded system performance, especially if multiple disks or a RAID level that requires intensive computation is used. In general, a hardware RAID controller is the best choice for systems that require high performance and reliability. RAID on the motherboard can be a good choice for systems with a limited budget or for systems where maximum performance is not required.
How long does it take to rebuild RAID 5 after replacing a disk in the array?
The time it takes to rebuild a RAID 5 array after a disk replacement depends on several factors, including the size of the disk being replaced, the speed of the disks, the performance of the RAID controller, and the load on the system during the rebuild process. Typically, the RAID 5 rebuild process takes anywhere from a few hours to a few days.
During a RAID 5 rebuild with a controller and medium performance disks, the data from the damaged disk is copied to the new disk. At this point, the array can be more vulnerable to data loss because if another disk in the array fails during the rebuild, it can result in complete data loss. Therefore, it is important to ensure that data is backed up reliably and disks are replaced periodically to reduce the risk of data loss in the event of a failure.
How many disks can be lost in RAID 5 ?
In RAID 5, you can lose one disk without losing data. This is achieved by using parity, which is calculated based on the data stored on all disks in the array. If one disk fails, the data on that disk can be recovered from the parity recorded on the remaining disks.
If you have anything to add to this article or have personal experience with rebuilding RAID5 on a motherboard controller, please leave a comment!