In this guide, we will look at how to use the “data recovery wizard” properly. The article will be useful to users who have lost important documents due to an unforeseen failure on their hard drive or any other information storage.
Before we proceed directly to recovering files, an important rule should be noted: under no circumstances make changes on a damaged device!
Successful recovery mostly depends on whether you follow this advice or not. Reporting that you do not need to make any changes on the disk with an error, we mean that you don’t need to do anything on it. Otherwise, there is a risk of irreversible data loss, in which even professional software will not be able to help.
How not to lose information completely
Let’s consider what gets into the list of unwanted actions:
- Do not delete, rename or perform other unnecessary manipulations with files and folders, even if you can see them and can interact with them .
- Do not save files on a damaged device.
- It is not recommended to immediately proceed to formatting the disk even with the help of system utilities such as fdisk or Formatting.
Not following the above tips, you are risking lose the important information permanently without the ability to restore it. If one of them has already been accomplished, do not worry. This is not necessarily 100% guaranteed to result in negative consequences, but try to keep direct interaction with the disk to a minimum in the future.
The Starus Partition Recovery application, or its cheaper counterparts with reduced functionality, Starus FAT Recovery, Starus NTFS Recovery, are designed to work with specific file systems – FAT and NTFS. The main software is able to interact with both. Applications are well suited for both home and office work, which makes them a universal utility for recovering information and logical partitions of hard drives.
Before purchasing, you can download and install a demo version of the program to check whether it is possible to recover documents from the HDD. In rare cases of critical damage, the “recovery wizard” and the BIOS are not able to detect the hard disk and emergency actions are needed to save the information. Disconnect your device as soon as possible! In such a situation, third-party software will not be able to provide the device with the necessary assistance and you will have to contact the service center for professional assistance.
Data recovery
If the system and the “recovery wizard” are able to detect the hard drive and you are ready to start recovering data, we recommend you to follow these steps:
1. Install Starus Partition Recovery on a computer with an intact HDD and make sure that it has enough memory to store the recovered information.
2. Turn off the computer and connect the second HDD to it, making it an external drive. When starting a PC, it is important to make sure that the BIOS is able to correctly detect which one is the main system drive and which one is connected additionally.
If you do not know how to connect an additional HDD to the device, contact the manufacturer of the drive.
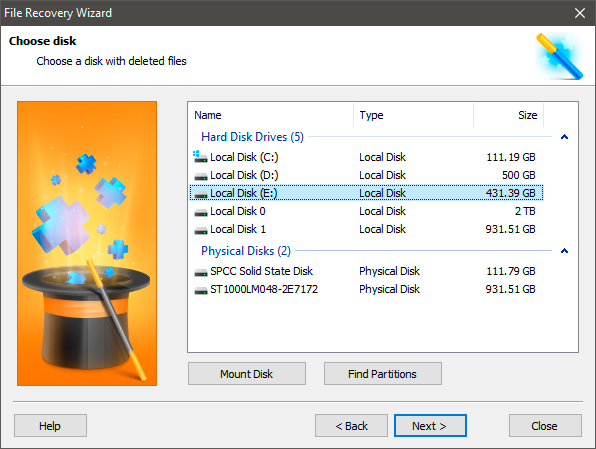
3. Run the program. By default, the File Recovery Wizard opens immediately upon startup. In the future, you can disable this feature. Click Next button and select the HDD that you want to scan.
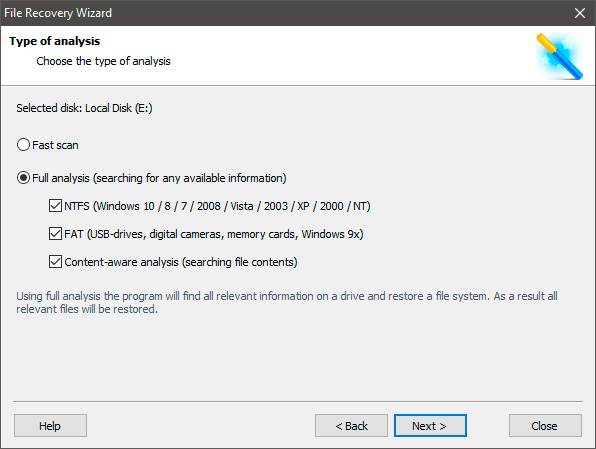
4. Select the most appropriate scan type. A quick scan performs an almost instant, superficial HDD check. It should be remembered that the depth of such a test will be significantly lower than with a full analysis. The second option will take more time, but the scan will allow the program to carefully examine the disk.
5. The program provides a convenient opportunity to preview, thereby eliminating users from blind searching only by names of target files. You can examine not only graphic content, text documents are also available for scanning.
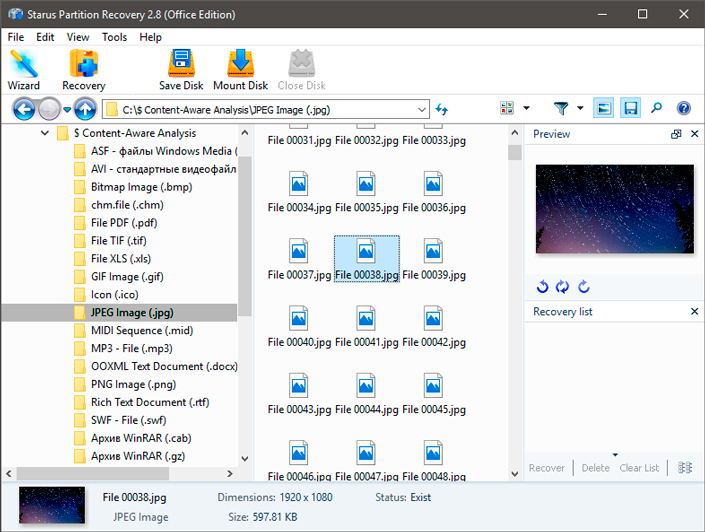
6. Having determined which files need to be restored, it’s time to proceed to recovery. Select the documents, right-click on any of them and click Restore button. Using Ctrl + R key combination will make it even faster.
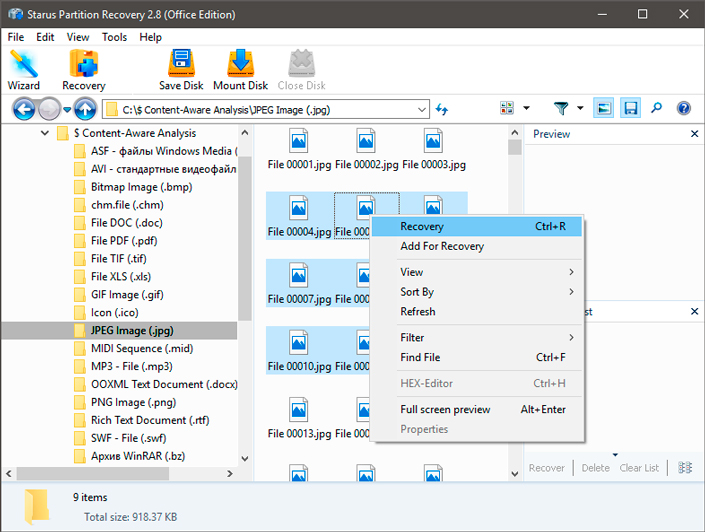
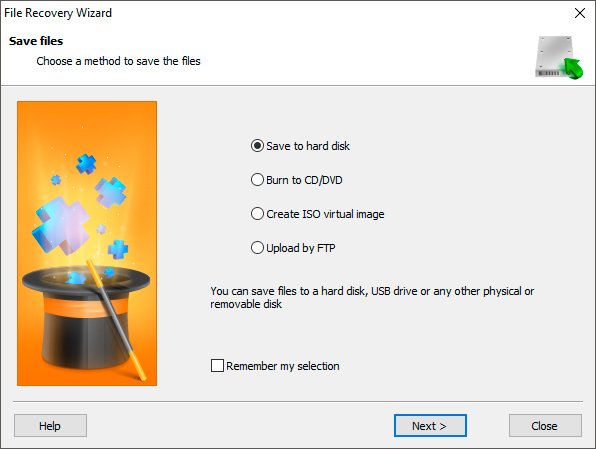
7. The program will offer you several possible options for exporting files:
Save to hard drive – all information will be saved to specified HDD. Under any circumstances do not save documents to a damaged drive from which you are recovering!
Burn to CD / DVD – save data to optical media, from which data can be transferred to any other device that has a DVD drive.
Create a virtual ISO image – works similar to optical media, but without the need to use a CD. Such parameters as autoload, boot sectors, file system type, etc. are saved.
Upload via FTP – the ability to transfer data using FTP servers.
Summarizing the article, if you are trying to recover data from a damaged hard drive, follow four simple rules:
- Never install the Recovery Wizard on a damaged HDD.
- Never use a device with an error as a bootable system drive (C:).
- Do not create folders, do not delete anything and do not perform any other actions on the damaged HDD.
- Never copy recoverable files to a damaged device.
In the case of neglecting these tips, you risk bringing the HDD to a critical state, in which the data recovery will be completely impossible.
If a logical partition is damaged on the hard drive and the file system is displayed as RAW, we recommend you to read the following article:
How to recover data from a RAW hard disk or a RAW partition
It is about the analysis of logical errors and ways to correct them!




If you have something to add on the topic "Successful data recovery" please leave a comment!